Naxqelvi
Frame Module
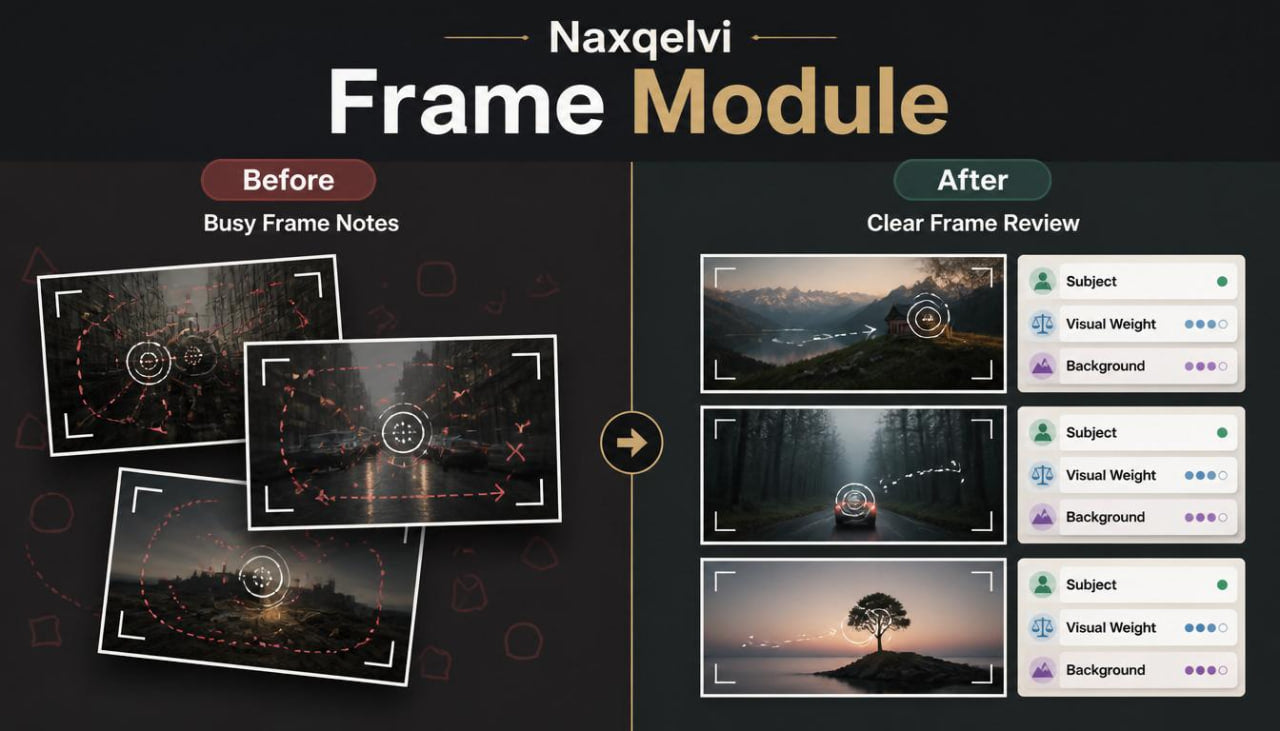
Frame Module
Couldn't load pickup availability
- Problem Statement
Many learners focus on cutting clips together but do not always study what is happening inside each frame. A sequence can feel uneven when framing, subject position, movement direction, and visual weight change without a clear reason. Learners may also struggle to understand why one shot feels connected to the next while another feels sudden or out of place. Without a method for reading frames, editing can become a process of guessing rather than careful review. Frame Module was created to help learners study the visual side of editing with more structure and attention.
- Solution
Frame Module introduces a practical way to study frames before, during, and after timeline arrangement. The materials guide learners through composition notes, subject placement, movement direction, shot balance, and visual continuity. Each topic is explained as part of the editing process, not as a separate design idea. Learners are encouraged to look at clips as visual building blocks that work together inside a sequence. This tier helps learners develop a steadier habit of reviewing what appears on screen before deciding where and how to cut.
- What’s Inside
Frame Module includes structured Naxqelvi materials focused on the relationship between frame composition and editing choices. The tier begins with an orientation section that explains why frames matter in the editing process. Learners are introduced to the idea that every clip has visual information: subject position, movement, background detail, direction, light mood, spacing, and visual weight. These details influence how one shot connects to the next.
The first main section focuses on frame reading. Learners study how to look at a frame before placing it in a sequence. This part explains how to identify the main subject, notice surrounding space, observe movement direction, and mark visual details that may affect the cut. The material uses simple examples where two similar clips feel different because of framing choices.
The second section explores subject placement. Learners review how a subject positioned in the center, side, foreground, or background can change the feeling of a scene. This section explains how placement can guide viewer attention and how sudden placement changes may affect flow. Learners are asked to compare frame notes and describe how subject position changes the sequence.
The third section introduces visual weight. Visual weight refers to how much attention a certain area of the frame carries. A bright object, strong movement, close subject, or busy background can pull attention. Frame Module explains how to notice these details and how they may influence the timing of a cut. Learners study how two visually heavy shots can feel crowded when placed together, while a calmer frame may give the sequence more breathing room.
The fourth section focuses on movement direction. If a subject moves from left to right in one clip and right to left in the next, the cut may feel sharper or more noticeable. Sometimes that contrast can be useful, but sometimes it can interrupt the flow. This section helps learners observe motion lines and decide whether a cut supports the intended scene rhythm.
The fifth section covers background continuity. Learners study how background elements can affect scene clarity. A change in setting, object placement, light mood, or visual clutter can alter the way clips connect. The material encourages learners to review background details instead of focusing only on the main subject.
Frame Module also includes a shot pairing worksheet. This worksheet helps learners compare two clips before placing them together. It includes spaces for subject placement, movement direction, visual weight, background notes, pacing intention, and cut reason. The worksheet is designed for repeated use during practice.
A frame-to-frame review checklist is also included. This checklist asks learners to review whether the subject remains clear, whether the viewer’s eye has a smooth path, whether movement direction feels intentional, and whether background changes support the sequence. The checklist helps learners examine visual flow in a calm and organized way.
The tier includes a short study task where learners arrange a small set of clips in two different ways and write notes about how the frame order changes the feeling of the sequence. This task encourages comparison rather than judgment. Learners can see how the same material can create a different mood depending on frame order and cut placement.
Frame Module also contains a glossary of frame-based editing terms. It covers subject placement, visual weight, movement direction, frame balance, background continuity, eye path, shot pairing, and cut reason. Each term is explained in clear language for learners who want a stronger vocabulary while reviewing their own edits.
The final section is a reflection page. Learners can write what they noticed about frame order, which shot pairings felt smoother, which moments felt too abrupt, and what they would change in a second version. This reflection process helps connect observation with practice.
- Who Is This For?
Frame Module is for learners who want to look beyond basic timeline order and study how individual frames affect the full edit. It is suitable for people who already understand starter editing ideas and want to pay more attention to composition, movement, and visual connection. This tier may be useful for learners who often feel that their cuts are technically placed correctly but still seem visually uneven.
Frame Module is also a good fit for learners who enjoy written notes, worksheets, and review-based practice. It does not require advanced background knowledge. The materials explain each idea step by step through frame observation and simple editing situations.
This tier is intended for learners who want to build a more thoughtful review habit. Instead of asking only where a cut should happen, learners begin asking what the frame is doing, where the eye moves, and how the next shot continues or changes that movement.
- What You’ll Learn
- How to read a frame before placing it in a timeline
- How subject placement affects viewer attention
- How visual weight can influence the feeling of a sequence
- How movement direction can support or interrupt scene flow
- How background details affect continuity between clips
- How to compare two shots before choosing a cut point
- How to use a shot pairing worksheet during practice
- How to review eye path from one frame to the next
- How to identify when a frame feels too visually crowded
- How to create a calmer sequence by balancing busy and quiet shots
- How to write useful frame notes for later review
- How to connect composition choices with editing rhythm
- 30-Day Refund Terms
Frame Module includes a 30-day refund request period according to the Naxqelvi store policy. Customers may submit a refund request within 30 days of purchase when the request follows the stated order conditions and refund rules.
Self-paced learning overview
- 📁 Digital file available after purchase
- 📚 Long-term availability
- 🔒 Secure checkout
- 🗓️ Content updated in 2026
What format are the Naxqelvi course materials provided in?
What format are the Naxqelvi course materials provided in?
Naxqelvi course materials are prepared as digital learning resources for self-paced study. They may include written modules, editing notes, planning tables, recap sections, practice tasks, and project-based examples.
Can I study the materials at my own pace?
Can I study the materials at my own pace?
Yes. The materials are created for gradual study, so learners can read, review, pause, return to earlier topics, and repeat practical tasks when needed.
Do I need previous editing knowledge before starting?
Do I need previous editing knowledge before starting?
No previous editing background is required for the starting tiers. The first materials introduce core ideas such as timeline order, scene rhythm, visual flow, transitions, and basic project organization.
Share